How to xray clothes
Its quite easy to x-ray clothes into xray nude, but its no magic.
Finding a picture that can be x-rayed might be hardest part of x-raying clothes. Once you find it, you can follow these steps and make your first before & after xray nude picture, like the one at the end of this tutorial.

Before you start, I suggest you browse my Xray nude portfolio, to see what kind of clothes work with this xray technique. This tutorial is made for Photoshop CS6. There might be some differences with the older or newer version of Photoshop. The commands in this tutorial are basic Photoshop commands, so you should be able to use them all in old and new PS versions, they just might look or are named differently. Most of those commands are also available in other photo editing programs such as Gimp, so you can try and improvise with a program you have if you don’t have Photoshop or x-ray vision for that matter.
This tutorial is made for personal use only. Use this tutorial and x-ray pictures you make only for your own entertainment, don’t be evil trying to harass someone with those pictures.
There are also some other techniques to make see-through clothes out there and I am familiar with most of them. Technique in this tutorial is what I use, it gives best result for xray nude in my opinion.
Step #1 How to pick right pictures for x-ray nudes
Like said before, this might be the hardest part of making xray nude. There are some rules in order to get best results with an x-ray technique.
- Clothes on the picture has to be at least a little bit see-through, either made of thin fabric or wet
- Shape of nipples and preferably shape of breasts should be visible
- Pictures with a bra or other double layer of clothes won’t work
- If you are x-raying panties, look for cameltoe picture
- Try to find pictures with light color clothes, without patterns or graphics on it
- Try to find pictures with soft shadows and soft light
There are some other things that affect quality of xray nude, but you’ll understand them with experience, after you finish this tutorial and see how this works.
Once you find the right picture to x-ray, right click it and open with Photoshop.
Step #2 Selection and levels adjustments

Select clothes you want to xray nude. There are several methods to make a selection, like marquee tools, lasso, magic wand and some other ones. Magnetic Lasso Tool might be simplest for this purpose.
In your toolbar find magnetic laso tool. Hotkey is L key. You can find it’s icon on your Tools panel, 3rd icon from above by default. If your 3rd icon is Laso Tool, just click it and hold it and you will get an option to select it.
If you don’t see Tools panel, make sure its turned on. Click on Windows on your menu bar, then check “Tools” option.
Magnetic lasso works like some kind of sticky line. Make first click on edge of clothes, then slowly run mouse along edges of clothes. Make a full circle around clothes and click again on dot you started with.
If you find it difficult to make a selection with Magnetic Lasso, you don’t have optimal properties set for Magnetic Lasso. The properties of any tool you have selected are displayed as a horizontal toolbar on top, right below the PS logo and main toolbar. Try adjusting contrast for sensitivity between different colors, or Frequency for more or less a reference points tool makes.
Making Levels mask
Once you made a selection with Magnetic Laso, click on “Layer” on your menu bar, then “New Adjustment Layer” and select “Levels”
Levels properties window will pop up. Select Auto Options. You can find it by clicking “arrow down with horizontal lines” icon in the upper right corner of Properties window.
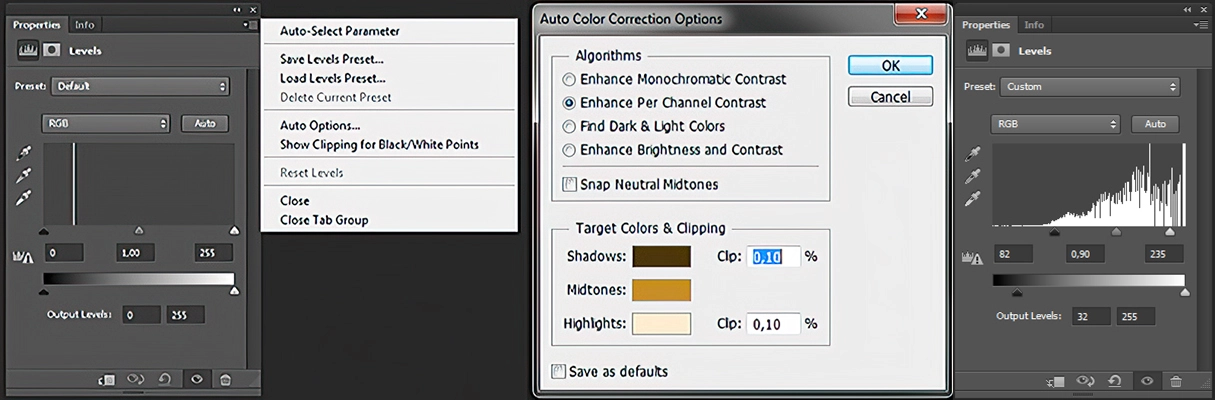
On the new window that pops up make a selection of “Enhance Per Channel Contrast”. You’ll see three colored triangles: Shadows, Midtones and Highlights. By clicking on each one, adjust colors to match her skin colors. Confirm it with OK
Back on the first properties window move sliders left and right until you get some optimal setting. There is no rule or pre-defined parameters here, it’ll be different for each picture. Watch the picture as you move the sliders and decide what setting works best for you.
Step #3 Making Brightness / Contrast Mask
To select part of the picture you are xraying nude, hold down Ctrl key and left click on black and white icon of your “Levels” layer. Once her shirt is highlighted, make sure Background layer is selected on your Layers window, then on menu bar navigate to Layer > New Adjustment Layer > Brightness / Contrast.
Brightness and contrast window opens up. Play around with those two sliders until you get some optimal result. Decrease brightness slightly and increase contrast.
Adding more masks
After adding those two common masks, try some more. I also often use Curve adjustment and Exposure. More masks are optional and some might not work for every picture, but try them to see what other adjustments do.
Curves adjustment is somewhat advanced, but useful once you get hung on it. In short, with curves you can alter contrast in some part of tone range. For example, you can increase contrast for midtones only by tinkering with the middle part of the graph line. Or decrease contrast of shadows by altering top of the curve.
Exposure adjustment is useful if you want to melt down or tune up the contrast of the whole area with Offset and Gamma Correction sliders.
Color Balance is pretty straight forward. I sometimes use it for xray nude, but not too often. You get to balance colors from yellow to blue, magenta to green, cyan to red. Put that mask layer on top of other layers before you do and keep in mind that you don’t have the final colors yet. You might as well use this as a final touch in step 5.
Step #4 Adding colors to x-rayed clothes
Hold Ctrl key and click on black and white icon on one of your mask layers to select x-rayed area and make new layer. You can find the New Layer icon at bottom of the Layers window, next to trash can icon.

Now select Eyedropper Tool ( hotkey I ) on your tools bar and click on nude skin to select its color.
Pick Paint Bucket Tool and fill highlighted selection. On the Layers panel change the layer’s blending mode from Normal to Hue.
Duplicate the layer you just made and change its blending mode to Soft Light. Change Opacity of that layer somewhere from 30% to 50%
Those blending settings might work differently for different pictures. Think of those settings as starting point and try to change both blending modes and opacity until you you get the best result.
Coloring nipples
Make another layer to add nipples color. By using the Brush Tool (B), make two dark red dots over her nipples. You can change brush color by clicking on the colored rectangle on the Tools toobar. Size and hardness of the brush can be changed just below your main menu toolbar.
Change blending mode of nipples layer to Soft Light and set opacity to 30%. If Soft light blending mode doesn’t work for you, try Vivid Light or Color Burn or some other blending mode. Same goes with Opacity. Play around with the opacity until you get a nice color of nipples under the shirt.
Step #5 Final touches
Details are the things that make good fake nudes. Take a good look at your xray nude. It should look like see-through clothes. If some detail looks off, you need to fix it. Here are some details that usually need some tinkering.
Adding non transparent parts of clothes

There are some parts of clothes that don’t cover the body, instead they fall freely aside. Of course, nude body is not visible under those parts, so we’ll cover those parts with original clothes and get only shape of body x-rayed. Not whole shirt
Copy Background layer on bottom by right clicking on it, then Duplicate Layer. Drag a new layer on top of all layers and name it “Non Transparent”
Using Eraser Tool (E) delete parts of clothes where clothes touch the skin. Change Opacity of eraser to 50% and erase wrinkled parts of clothes that don’t touch the skin. Leave parts of clothes that don’t cover the body. You can also leave thicker parts of clothes like a collar or some graphics or patterns on clothes. Whatever would make it more realistic.
Adding more shadows and highlights
Pay attention to the light source angle. Are all the shadows in place? Xrayed nude body inherited shadows of clothes, but those aren’t always the same as shadows of nude body would look like. Try to spot those parts.
In the Tools toolbar you’ll find Burn Tool. Once selected look up under the main menu for its properties. Set Range to Midtones and Exposure to 25%. Adjust size of the brush depending on your image resolution, so you get a circle about the size of the girl’s chin. Draw on picture to add some more shadows.
Click and hold the Burn Tool icon and pick Dodge tool. In properties change Range to Midtones and exposure around 25%. Draw on picture to add more highlights.
A nice trick here is to draw on boobs, adding more highlights where light would fall on breasts if they were exposed and add more shadows on the opposite side. Don’t overdo it, keep it realistic.
And you are done! Don’t forget to save your work.

That’s it. You can see that the clothes didn’t magically disappeared. X-raying clothes to nude is just enhancing transparency of clothes and adding come skin colors.
X-ray nudes vs. Fakeray nudes
There is a big difference between xray nude and fakeray nude. Fakeray nudes are much harder to make and you get much better result from it.
Fakeray nudes can be made with almost any picture, no matter what kind of clothes she is wearing. You can also see much more details on fakeray pictures and clothes can be more transparent than x-ray technique.
If you want a fakeray picture, make me a request and I’ll make it for you. There are some more samples of fakeray work in my fakeray nude portfolio if you want to take a look.
X-ray apps and other stuff
There are some apps advertised to be apps for see through clothes. I haven’t tried them, but I get how they work. Aside from those that don’t work at all, those that do are just bad.
They have an integrated curves adjustment that is very limited and brighnes&contrast option. I… wouldn’t recommend downloading them.
There are also high-tech night-vision video cameras that can somewhat see through clothes. But its still not there yet. That is a technology of rendering the heat signature of a body in on the image. Some neat thing, but its still not the real see-through clothes vision.
And just to mention those airport scanners while I’m at it. Not that practical for this purpose, is it.
And that’s it what technology has to offer for now. Don’t get fooled into buying some stuff that doesn’t work.
Until something better comes out, have fun making x-ray nudes and remember:
Pictures you make are for your entertainment only. Don’t be a dick and try to harass someone or misuse them. Keep them to yourself.
The model used for this tutorial is Elle B.
If you want to share or post that infographics picture from beginning of the tutorial, you can, but at least give me a link as a credit. I would appreciate it.